Using This Adventure
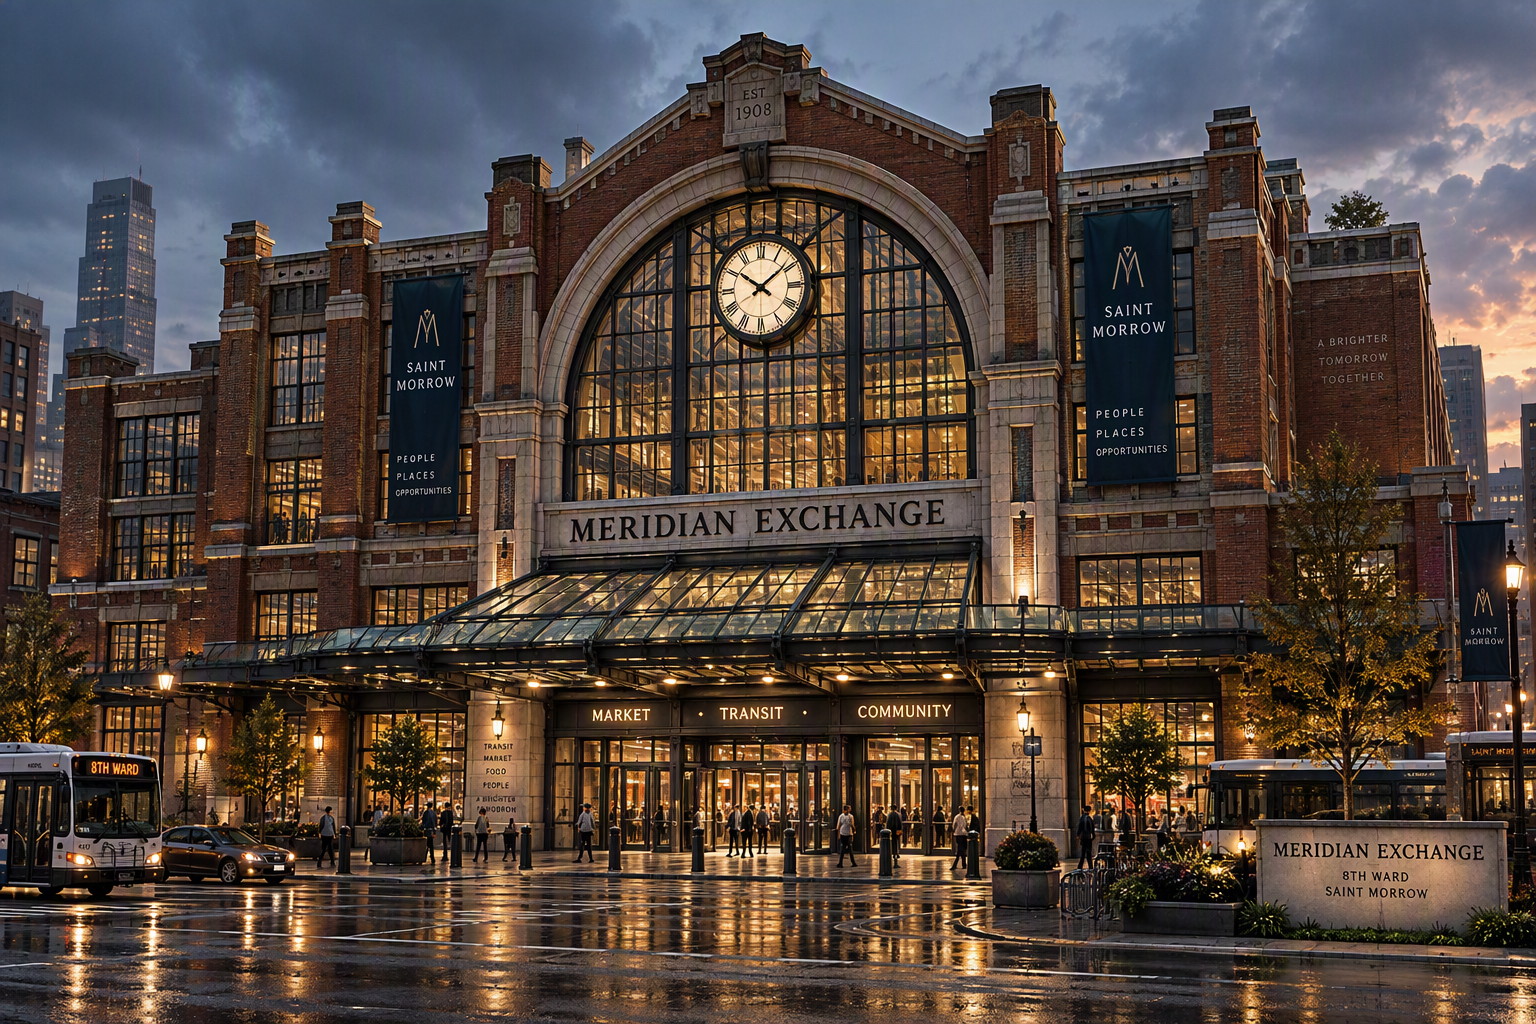
The Crate in Bay Three is an introductory urban mystery set in Meridian Exchange, a functioning transit hub, market, civic workplace, residence, and service complex in Saint Morrow's Eighth Ward. The adventure introduces the city through ordinary movement and work, then allows something impossible to intrude through records, infrastructure, and routine.
ADVENTURE AT A GLANCE
- Format
- One session, or two shorter sessions
- Play time
- 4-6 hours
- Party
- 3-6 beginning characters
- Primary play
- Investigation, social scenes, exploration
- Combat
- Optional and nonessential
- Ending
- Evidence of activity beyond B2, without entry into the deeper tunnels
SYSTEM ASSUMPTIONS
Checks use a familiar d20 structure. Replace skill names with the closest equivalents in your game. Suggested DCs assume competent beginning characters: DC 10 easy, DC 12 routine, DC 13 challenging, DC 14 difficult, and DC 16 exceptional.
FAIL FORWARD
Never withhold a required clue because of one failed roll. A failure should cost time, worsen trust, attract attention, or remove an advantage. The investigation always reaches the service tunnel.
CONTENT AND TONE
The adventure contains confined service spaces, structural collapse, institutional secrecy, and implied supernatural activity. Keep the city modern first and fantastical second. The menace comes from authentic paperwork describing impossible routine.
Back to topAdventure Overview
THE PREMISE
A mud-covered crate appears inside a secured receiving room near Bay Three. No one delivered it. Cameras recorded no arrival. The lock is intact. Inside are genuine Meridian Exchange records for departments and personnel that do not exist.
The records repeatedly reference Utility Junction 14 and Tunnel Sector C . Both lie beyond service tunnels marked as collapsed south of Basement B2.
GM SUMMARY
Utility Junction 14 once formed part of a deeper utility network. Modern records say the tunnels were abandoned after structural failure. Nevertheless, recent work orders indicate that unknown personnel still inspect and maintain the junction.
The adventure does not explain who these workers are or how they cross the collapse. The characters discover only evidence: authentic documentation, prior objects, missing archival records, a legitimately opened security door, fresh tracks emerging from an impassable tunnel, and a current logbook signed by an employee who never existed.
DO NOT REVEAL YET
- What lies beyond Tunnel Sector C.
- How the crate entered the secured room.
- Whether J. Cress is one person, a title, or something else.
- Whether the deeper infrastructure is supernatural, displaced, or deliberately concealed.
CORE GOALS
- The characters meet and choose to cooperate.
- The group explores the Exchange's public and working life.
- Important NPCs become recurring contacts.
- The group identifies Junction 14 as a missing location.
- Tomas grants access to B1 and B2.
- The group finds recent evidence beyond the collapsed tunnels.
- The session ends before anyone crosses the collapse.
ADVENTURE HOOKS
NEW ARRIVAL
A character reaches Saint Morrow by bus and is delayed by the security response.
CONTRACTOR OR APPLICANT
A character has an appointment with Administration, Transit Operations, or Building Services.
RESIDENT OR COMMUTER
A regular user of Meridian Exchange recognizes that the level of security around one receiving room is unusual.
PROFESSIONAL CURIOSITY
A character has experience with records, reporting, engineering, city services, security, or local history.
Back to topMeridian Exchange
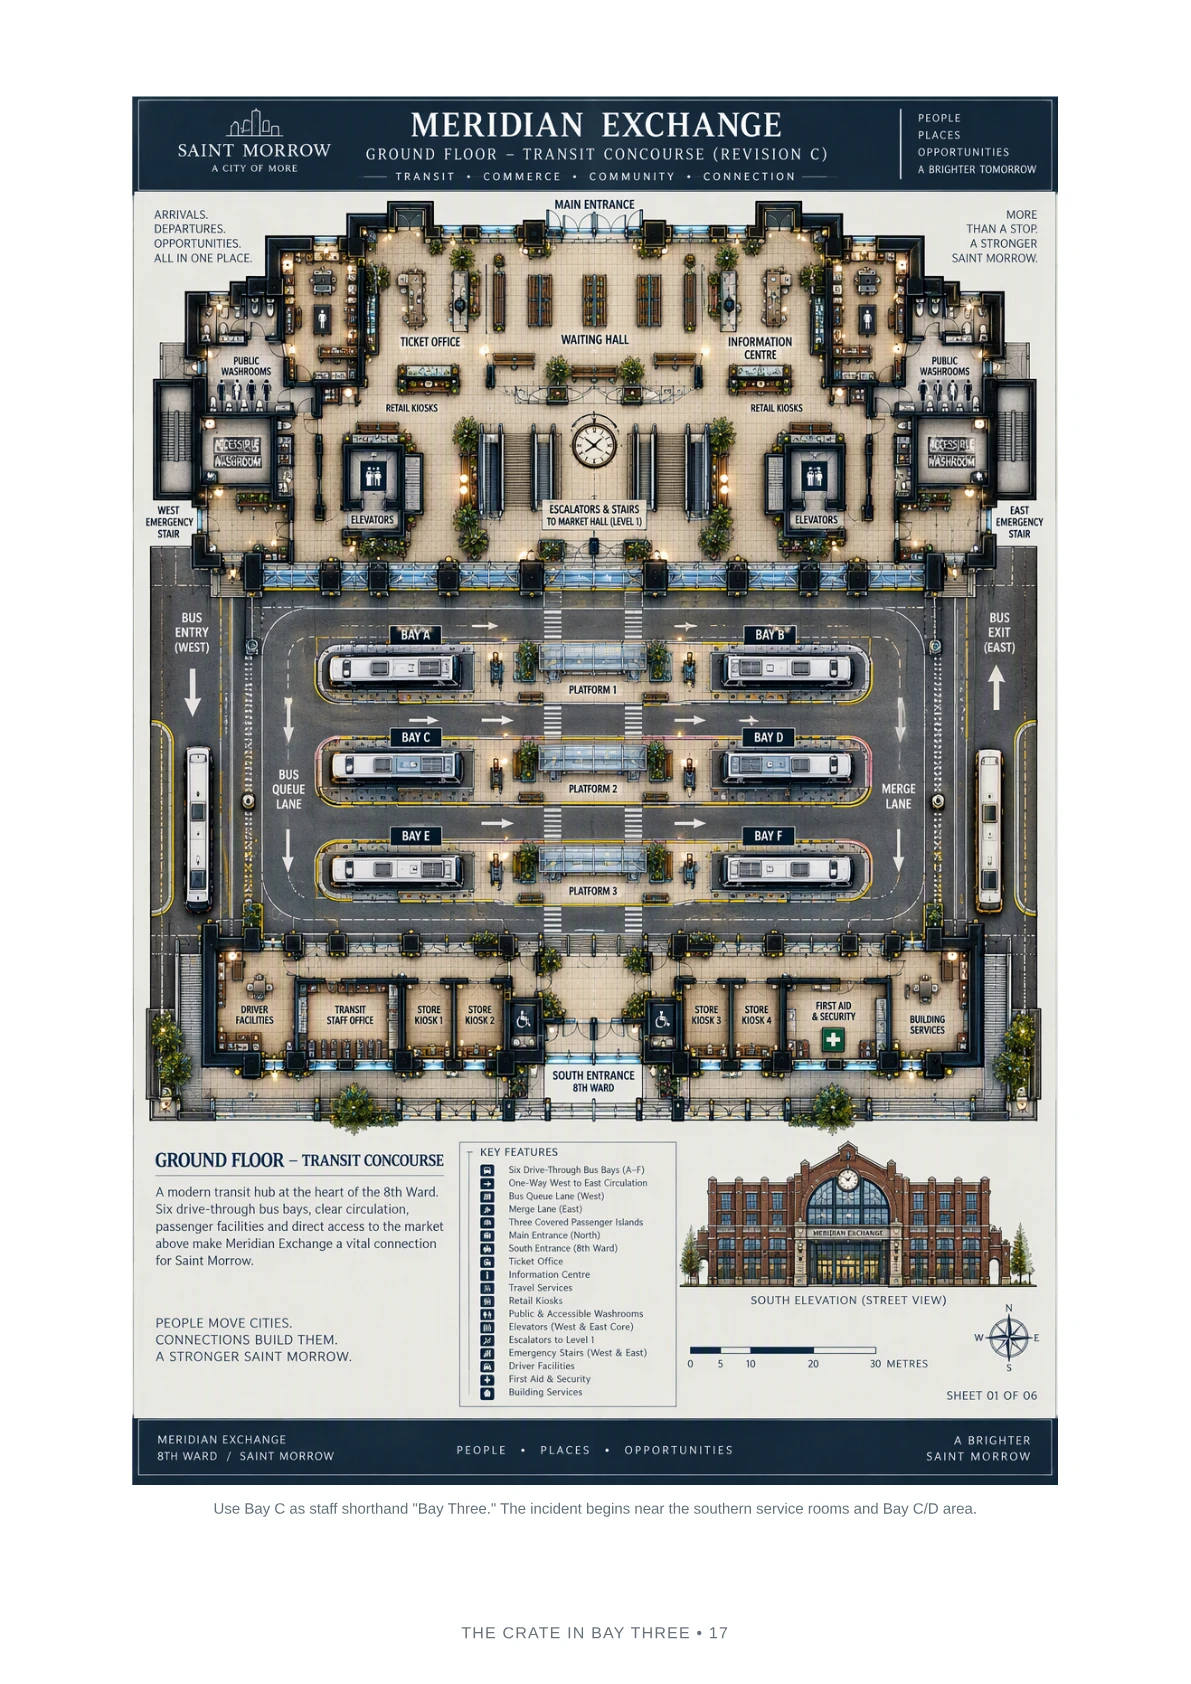
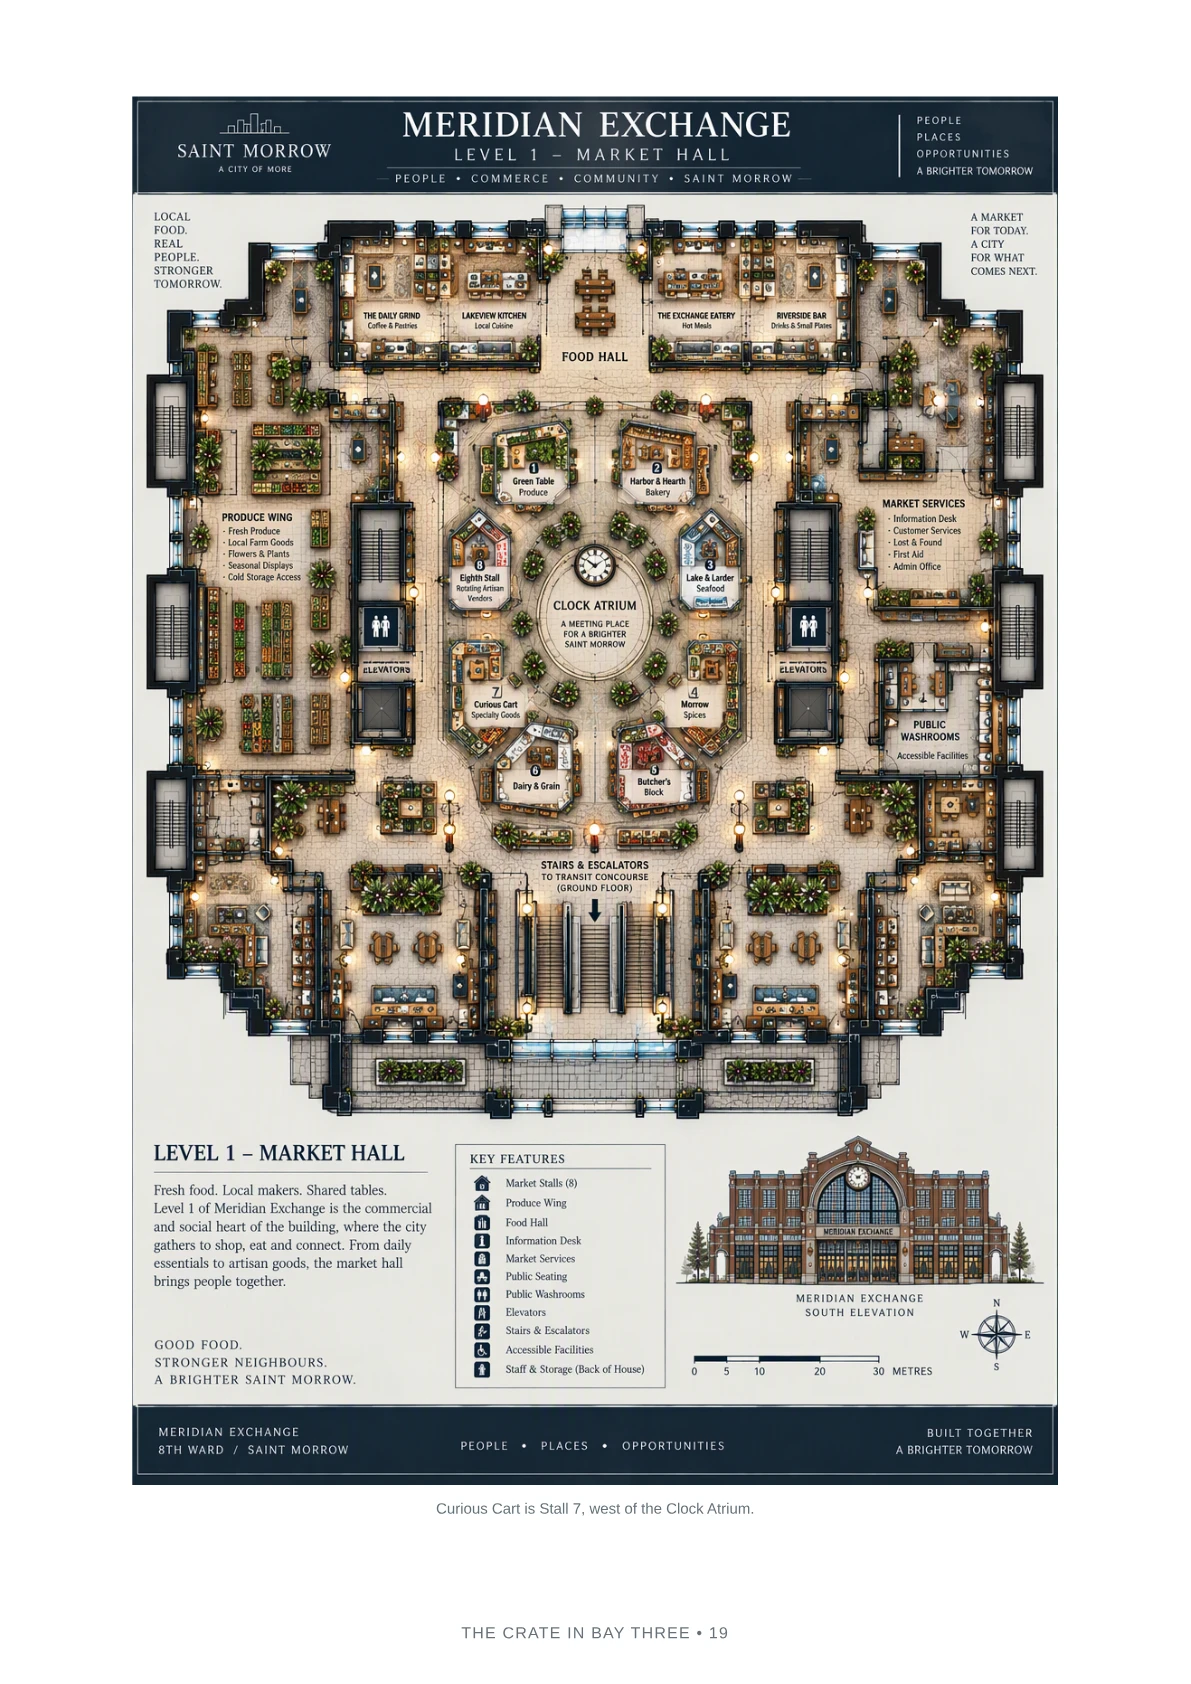
Meridian Exchange is a regional transit hub and city market built around everyday movement. The ground-floor concourse contains six drive-through bus bays. Level 1 holds the Market Hall and Clock Atrium. Level 2 houses administration, transit operations, security, and archives. Level 3 is residential. B1 supports deliveries, storage, maintenance, waste handling, and fleet repair. B2 contains the mechanical systems that keep the entire building operating.
ATMOSPHERE
- Public floors
- Rain-dark glass, coffee, wet coats, announcements, rolling luggage, warm food, municipal signage.
- Working floors
- Radios, printers, safety doors, staff badges, freight elevators, schedules.
- B1
- Forklifts, cold air, deliveries, concrete, fluorescent light.
- B2
- Pumps, fans, heat, pipe vibration, regulated access, hearing protection.
- Tunnels
- Darkness, mud, mineral water, old concrete, distant metal.
RUNNING THE BUILDING
The Exchange remains operational throughout the adventure. Staff have work to do and cannot simply follow investigators around. Crowds, scheduled deliveries, shift changes, and access control make the location feel inhabited.
VERTICAL PROGRESSION
Ground Incident ›
Level 1 Market › Level 2 Records › B1 Service › B2 Mechanical
IMPORTANT LOCATIONS
| Area | Use in Play |
|---|---|
| Bay Three receiving room | Crate scene, first forensic clues, camera anomaly. |
| Curious Cart | Prior object, collector rumor, local texture. |
| Level 2 Archives | Ghost references and obsolete engineering diagram. |
| Transit Operations | Route U-14 and procedural authenticity. |
| B1 Maintenance Workshop | Tomas confirms the forms and authorizes descent. |
| B2 Service Tunnel Access | Final evidence, tracks, logbook, collapse. |
THE BAY NUMBER
Public signage labels the bus positions A-F. Staff colloquially call the central platform positions Bays One through Six. "Bay Three" refers to Bay C in public- facing plans. This small mismatch helps the incident sound like workplace shorthand rather than a public announcement.
Back to topCast of Characters
RAFI SOLIS
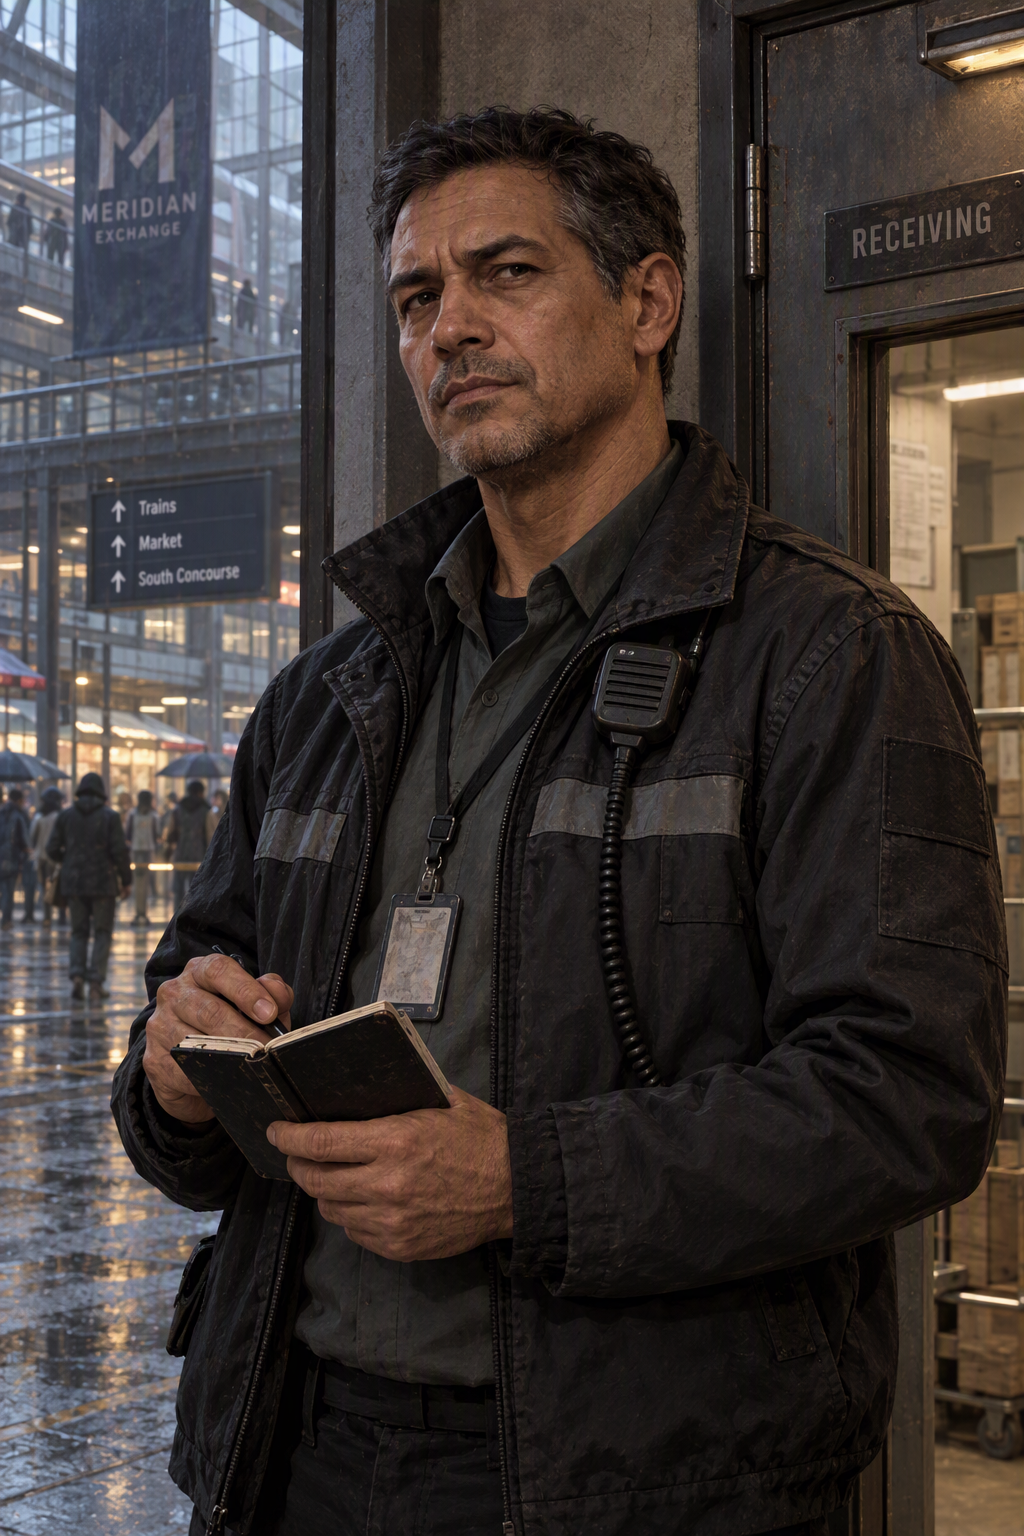
Security shift lead
- Goal
- Restore normal operations and avoid panic.
- Personality
- Direct, practical, skeptical.
- Motivation
- Protect staff and preserve a clean chain of evidence.
- Secret
- Rafi quietly stored prior unexplained objects rather than file reports that would go nowhere.
- Voice
- "Give me facts, not theories."
MIRIAM ASHCROFT

Records archivist
- Goal
- Explain the impossible document references.
- Personality
- Patient, exacting, persistent.
- Motivation
- Records should describe reality. These do not.
- Secret
- Miriam once found a blank archival box with a valid accession number.
- Voice
- "Missing is a condition. This was never created."
ANIKA MOSS
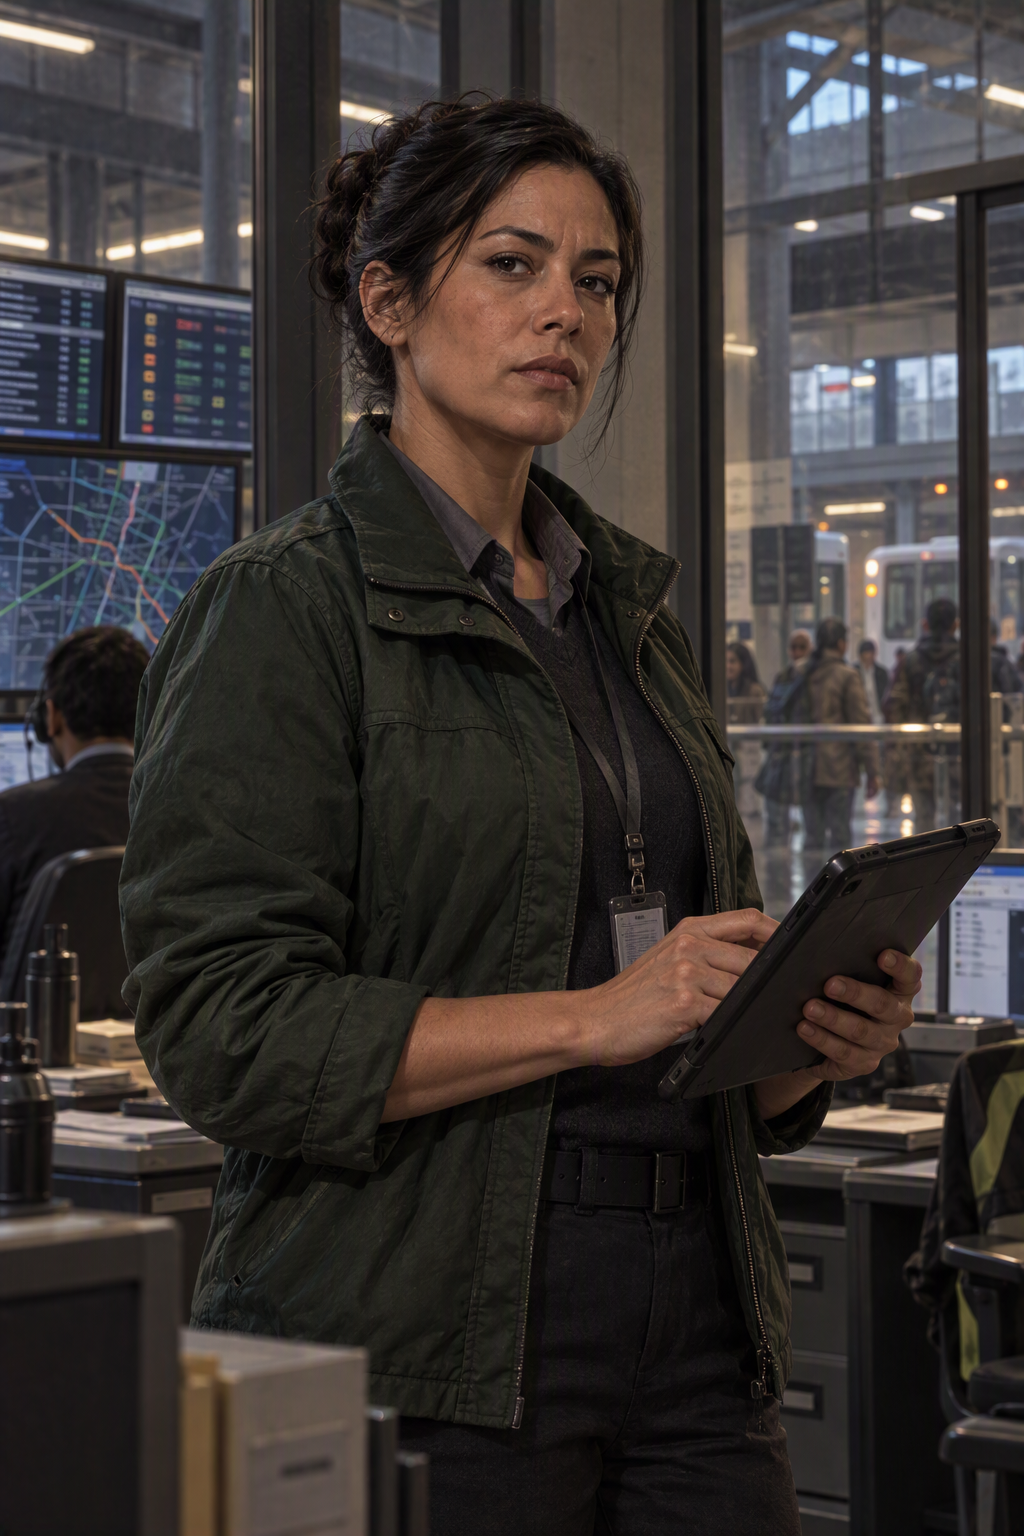
Transit operations supervisor
- Goal
- Determine whether the schedules threaten service.
- Personality
- Focused, efficient, blunt.
- Motivation
- Protect passengers and the live timetable.
- Secret
- Route U-14 resembles an internal designation used before the current scheduling system.
- Voice
- "Incorrect routes look wrong. These look discontinued."
TOMAS RHEE
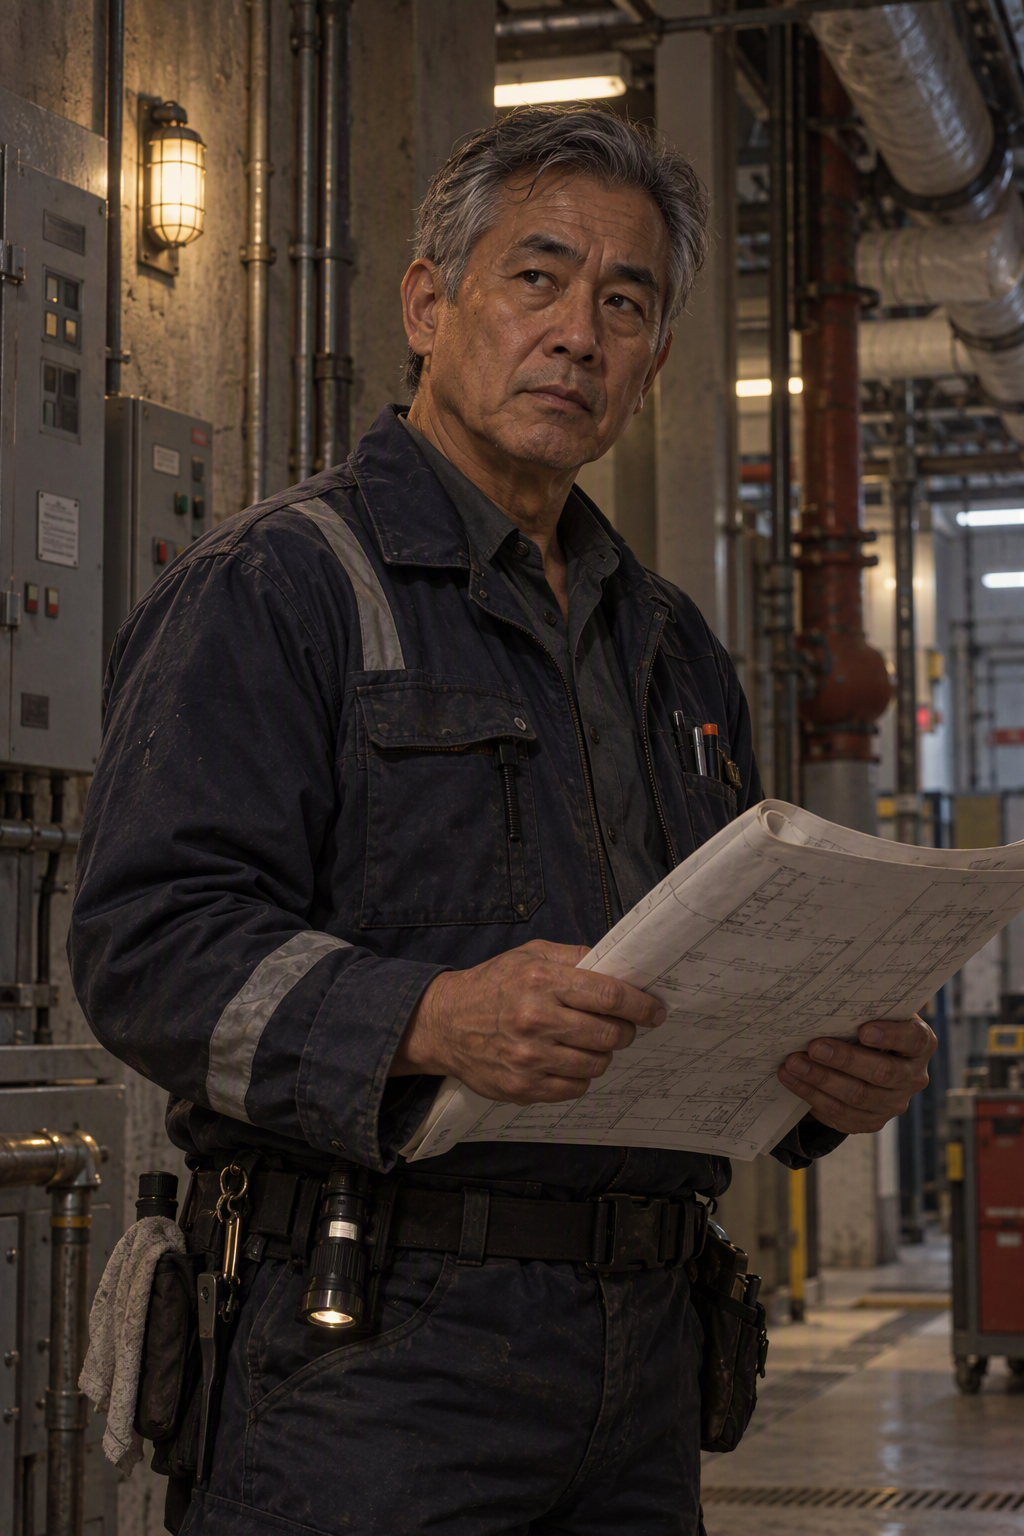
Chief building engineer
- Goal
- Keep the Exchange operating safely.
- Personality
- Calm, experienced, guarded.
- Motivation
- Infrastructure is a promise that people can depend on.
- Secret
- Tomas has heard metal movement beyond the southern collapse during overnight callouts.
- Voice
- "Buildings make noise. That does not mean every noise is normal."
KIT ROWAN
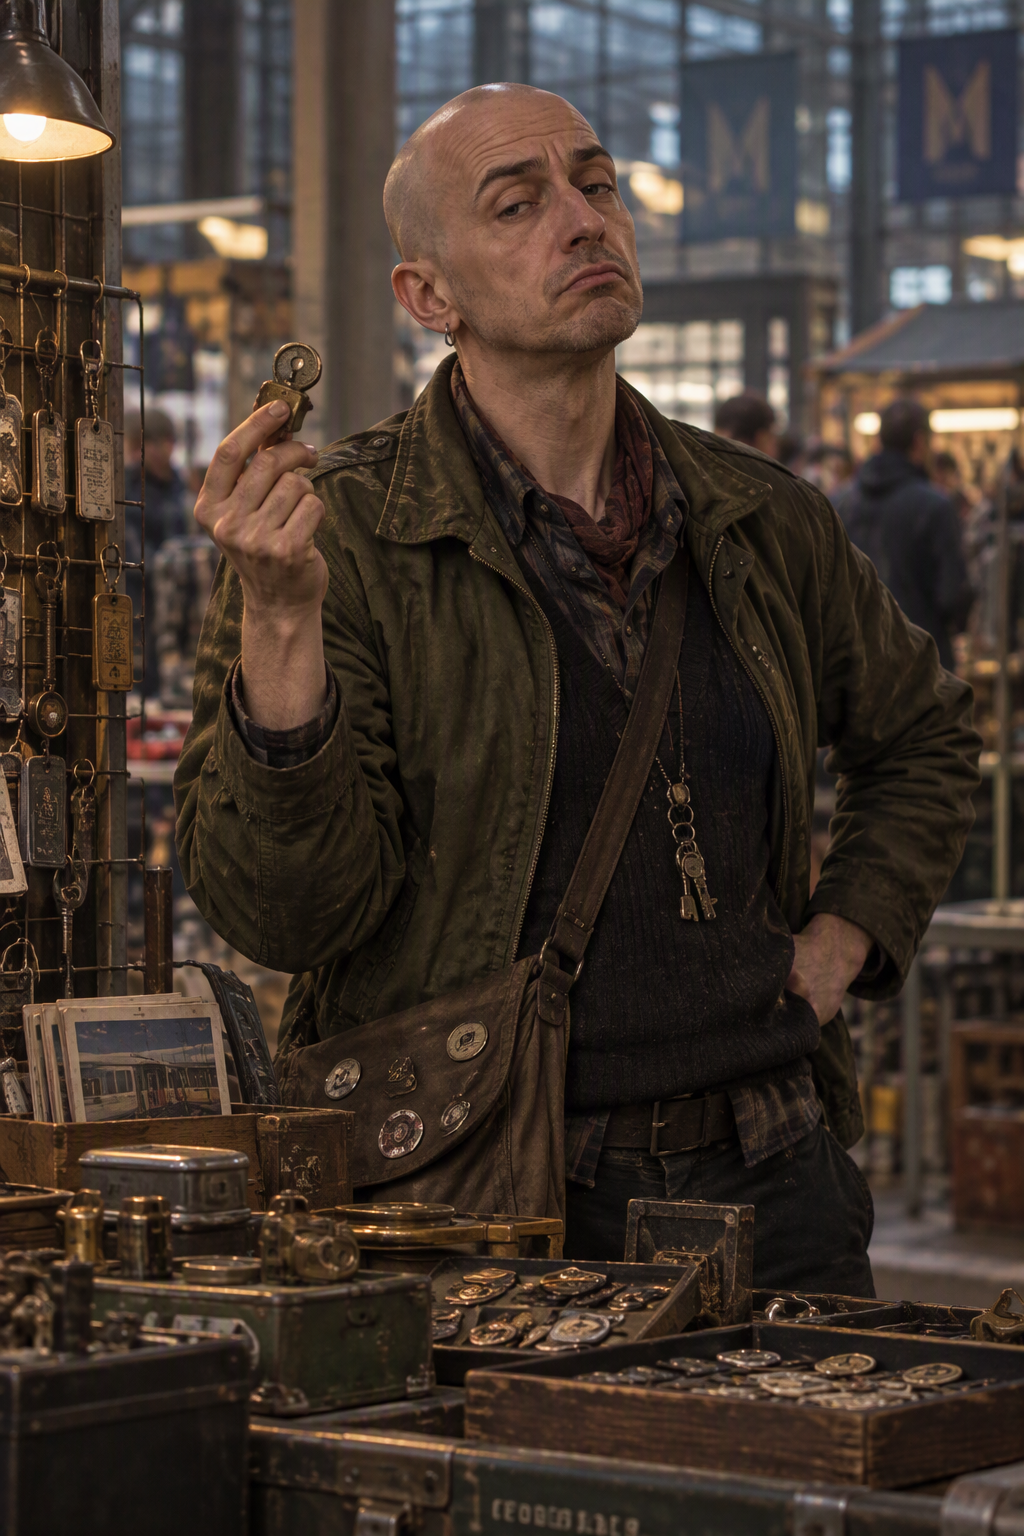
Curious Cart vendor
- Goal
- Learn the story without losing access to unusual stock.
- Personality
- Sociable, observant, selective.
- Motivation
- Every object has a buyer and a history.
- Secret
- Kit retained the contact card of the collector who bought a similar badge.
- Voice
- "The price tells you what someone knows."
J. CRESS
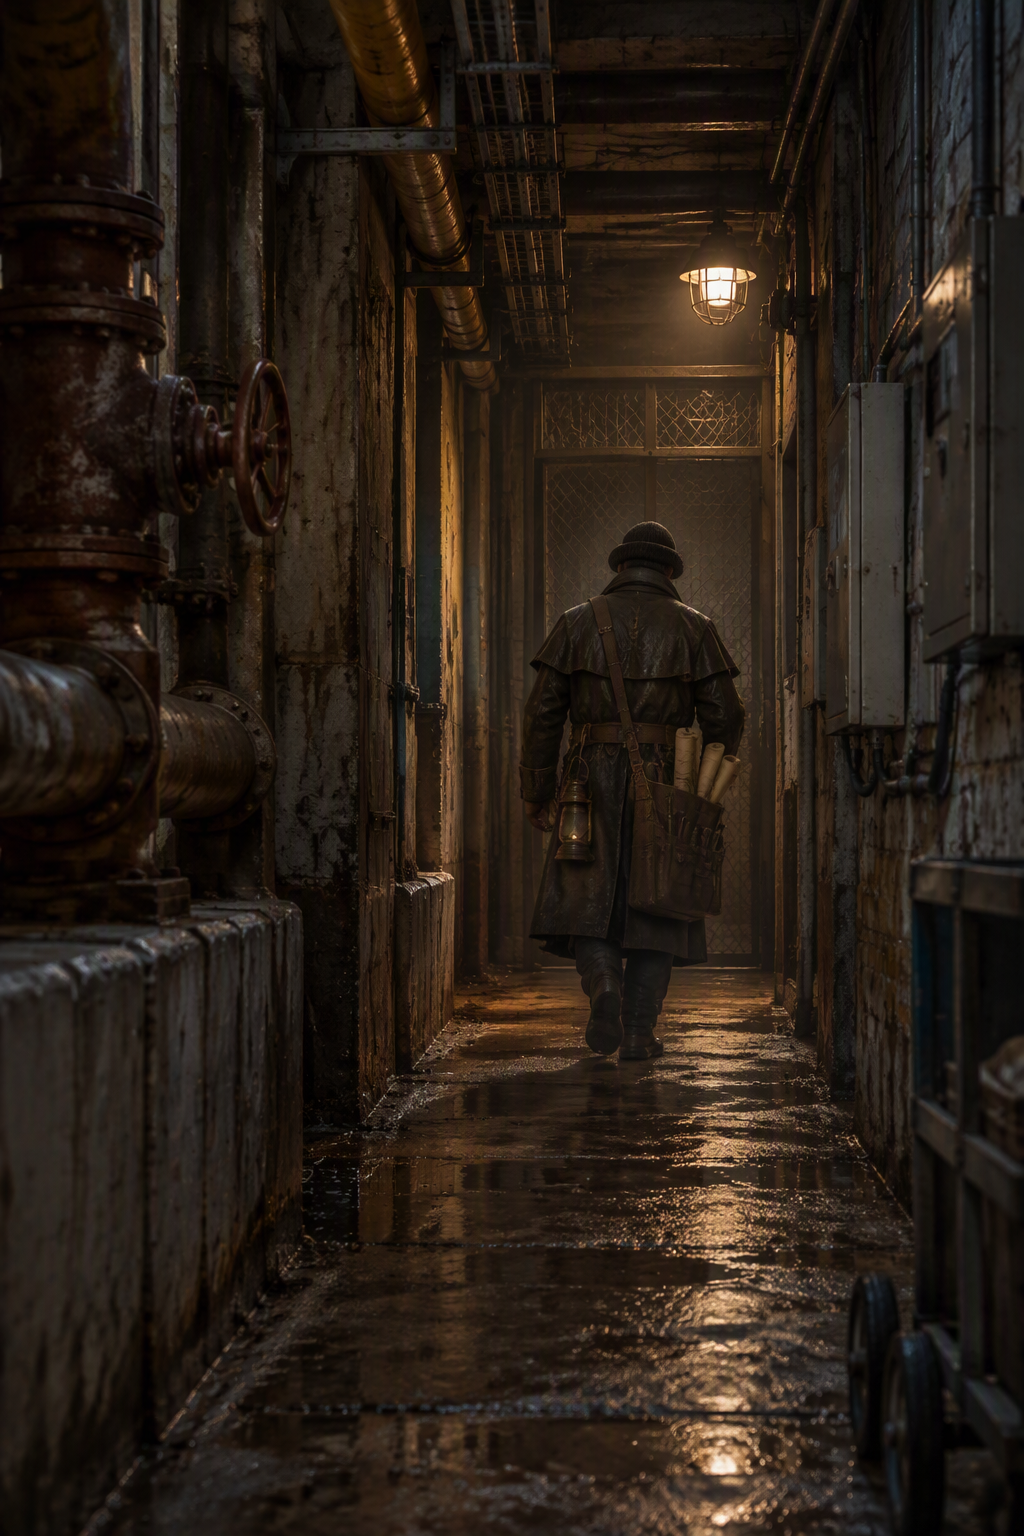
Unknown maintenance signatory
- Goal
- Unknown.
- Personality
- Known only through concise, routine entries.
- Motivation
- Keep Utility Junction 14 operational.
- Secret
- The same handwriting appears across more than five decades.
- Voice
- Never encountered in Session 1.
RELATIONSHIP RULE
Each NPC should provide help for a reason, not merely because a check succeeds. Characters can earn cooperation through professionalism, empathy, useful expertise, discretion, or by protecting ongoing work.
Back to topClue Structure and Fail-Forward Design
THE THREE-REVELATION RULE
Every critical conclusion has at least three supporting clues. A failed check changes when or how a clue arrives, not whether the adventure continues.
| Conclusion | Available Clues |
|---|---|
| The crate did not enter normally. | No mud trail; intact lock; 14-second camera loss; no delivery record. |
| The documents are genuine. | Correct form stock; valid numbering; engineering terminology; route syntax. |
| Junction 14 was real. | Obsolete diagram; repeated work orders; Route U-14; tunnel sector references. |
| Someone recently came from beyond the collapse. | Fresh outward tracks; cart wheel mark; unlocked access door; new logbook. |
CLUE LADDER
- Impossible arrival: establishes the mystery.
- Authentic procedure: removes simple forgery as an answer.
- Repeated location: gives the group a concrete objective.
- Obsolete infrastructure: connects the objective to B2.
- Recent activity: makes the contradiction physical.
FAILURE COSTS
- Security restricts access and requires an escort.
- A contact provides only one clue instead of two.
- The group loses time and reaches B1 during shift change.
- An NPC records character names in an incident report.
- The final door is relocked, requiring Tomas' master key.
OPTIONAL TENSION CLOCK
Start at 0. Increase the clock after disruptive behavior, conspicuous failure, or unnecessary delay.
| Step | Effect |
|---|---|
| 1 | Rumors spread through the Market Hall. |
| 2 | Administration asks Rafi for a formal incident report. |
| 3 | The crate is scheduled for off-site evidence storage. |
| 4 | B2 access requires Tomas to stake personal authority. |
WEB-EDITION CLOCK CLARIFICATIONS
When to advance
If you use the optional clock, advance it once for a distinct consequential setback, not for every unsuccessful skill check. A failed group challenge or freight-lane incident advances it once when that outcome calls for it; do not also charge for the rolls that produced that same outcome. Routine questions, reasonable investigation, accessibility needs, and time players spend discussing a plan are not unnecessary delay. Tell the players what changed in the building when the clock advances.
At the limit
Cap the clock at 4 and apply each step's effect once. At step 3, the crate is scheduled for transfer, not made instantly unavailable: let the group copy essential references, or have Miriam and Rafi retain an inventory. At step 4, Tomas records his authorization and personally supervises the inspection; B2 is not locked out of the adventure. Further setbacks can cost time, discretion, or trust, but do not add clock steps, revoke required clues, or make the collapse safe to cross. If the clock is disabled, use those practical consequences without tracking a number.
Back to topScene 1: Rain at the Exchange
PURPOSE: INTRODUCE THE PARTY AND ESTABLISH ORDINARY CITY LIFE
Rain streaks the high windows of Meridian Exchange as six buses arrive in quick succession. Wet tires hiss across the concourse. Departure boards click to new times. Above, the smell of coffee and warm bread drifts down from the Market Hall. Then a transit worker shouts near Bay Three, security begins moving, and the crowd bends toward a narrow service door.
BRINGING THE CHARACTERS TOGETHER
Ask each player why the character is at the Exchange and what catches the character's attention. Then give each character one immediate opportunity: steady a fallen passenger, recover a dropped folder, translate a shouted instruction, notice the crate's mud, or help security clear space.
ENCOUNTER: CROWD CONTROL
Rafi needs room to work. A commuter is filming, a delivery worker insists the room was empty, and a bus is blocking the adjacent lane.
- Perception DC 10
- The room has mud around the crate but no trail crossing the threshold.
- Investigation DC 12
- The lock and hinges show no forced entry.
- Insight DC 12
- Rafi is irritated rather than shocked. Something about this feels familiar.
- Persuasion DC 13
- Rafi allows supervised access before the room is sealed.
AUTOMATIC CLUE
The crate is real, damp, and unregistered. Even if the group is kept back, Rafi later recruits competent witnesses because the incident report needs independent statements.
COMPLICATION: THE MOVING BUS
A bus begins rolling before the driver sees a maintenance trolley in the merge lane. A character can intervene with Athletics, vehicles, a commanding shout, or another suitable check at DC 11. Success prevents a minor collision and earns Anika's later cooperation. Failure causes noise and delay, but no serious injury.
RAFI'S INITIAL POSITION
"Somebody got access, somebody placed the crate, and somebody thinks the cameras make a good joke. That is the explanation until evidence gives me a better one."
WEB-EDITION GM GUIDANCE
Player choices
Give each arrival a person to respond to, not just a skill to roll. The fallen passenger needs help collecting belongings; the delivery worker wants someone to confirm the room was empty; the filming commuter wants an explanation. Ask what each character does before resolving checks. Ordinary helpful actions need no roll unless there is uncertainty or pressure. Let Rafi notice competent behavior and ask those characters to stay as witnesses, giving strangers a practical reason to introduce themselves and cooperate.
Access and setbacks
For the crowd-control checks, separate evidence from access. A failed Perception or Investigation check means the character cannot verify the detail from the crowd; Rafi can show the muddy threshold or intact lock during the supervised examination. Failed Insight leaves his irritation ambiguous. Failed Persuasion delays entry until security has recorded witness names, rather than removing the adventure's starting point. Professional help may earn supervised access without persuasion. If players walk away, offer a request for a statement through their original appointment or contact; ask whether they accept rather than forcing cooperation.
Resolve the bus hazard
Run the moving bus as one immediate problem: describe the rolling vehicle, the trolley, and who is in reach, then ask who intervenes and how. Resolve a suitable action with the existing DC 11; do not require a sequence of extra checks after a successful intervention. On failure, the driver brakes amid shouting and a minor collision or obstruction, delaying departures. Anika later remembers whether the group helped clear the lane or simply watched. Keep this ordinary mishap distinct from the crate's impossible arrival.
Back to topScenes 2-3: The Room and the Crate
SCENE 2: SECURED RECEIVING ROOM
The room contains shelving, folded barriers, cleaning signs, and the crate. Dust is disturbed only beneath it. The floor drain holds fresh grit unlike street residue near the bus lanes.
ROOM EXAMINATION
- Forensics DC 12
- The mud contains pale mineral grit and rust-red clay, not ordinary roadway dirt.
- Security DC 13
- The lock was opened with a correct key or equivalent credential.
- Technology DC 14
- The camera feed lost exactly 14 seconds at 03:17. The crate appears when video returns.
CAMERA REVIEW
If no character checks the footage now, Rafi supplies the anomaly after the group follows another lead. The repeating number 14 should feel suggestive, not conclusive.
SCENE 3: OPENING THE CRATE
The lid is secured with ordinary nails. Inside, documents and equipment are packed by category rather than value.
VISIBLE CONTENTS
- Maintenance work orders and conductor notebooks.
- Transit badges carrying unfamiliar department names.
- Utility keys with machine-stamped codes.
- Folded uniforms in an obsolete but plausible style.
- A lunch pail containing a recent receipt with unreadable location data.
- Route schedules and repair reports.
GROUP CHALLENGE
Gain 3 successes before 2 failures. Each character may lead once.
- Investigation DC 12
- Find repeated references to Utility Junction 14.
- History DC 12
- The paper, badges, and uniforms span several decades.
- Perception DC 12
- Different reports use strikingly similar handwriting.
- Bureaucracy DC 12
- The forms follow real approval and numbering conventions.
OUTCOME
Success: The group identifies Junction 14, Tunnel Sector C, and dates from three days ago. Failure: The group identifies Junction 14. Miriam later finds the tunnel and date references, but the Tension Clock advances.
WEB-EDITION GM GUIDANCE
Preserve and examine the scene
Before opening the crate, let the group decide how to preserve the scene: photograph the floor, record the lock, take a small mud sample, or have Rafi witness the opening. The room smells of damp wood and cleaning fluid. Keep its contents mundane; the shelves, barriers, and drain are not secret mechanisms. Forensics distinguishes the mineral grit from roadway residue. Security rules out obvious forced entry but does not identify the credential holder. Technology isolates the footage gap, not the cause of it. A failed examination means an inconclusive result or delayed access to equipment; retain the existing fallback that Rafi supplies the camera anomaly later.
Evidence to describe
Let players choose which contents to examine first. A work order provides numbered fields and a signature; a badge carries an unfamiliar department; a key has a stamped code; a uniform looks obsolete but professionally made. Describe those visible details freely. Use the group challenge to establish the connections between items. Give a successful check a physical comparison: matching references on two forms, different ages of paper, repeated letter shapes, or consistent approval boxes. Do not claim that any one item explains the delivery, identifies J. Cress, or gives unrestricted access to the building.
Challenge rounds and next leads
Web-edition clarification: Each character may lead once per round of analysis. If everyone has led and neither threshold has been reached, start another round: a character may lead again using a different item or method, retaining all successes and failures. Stop at 3 successes or 2 failures regardless of party size. Do not count running out of unused leaders as a failure. A failed roll can mean mixing documents from different decades or following a misleading department name. The required Junction 14 reference always survives. End by asking which question the group wants answered first: the records, the route, the earlier objects, the sale, or the engineering. Those choices lead directly into Scene 4.
Back to topScene 4: Five Routes Through the Exchange
Characters can pursue these leads in any order. Complete any three to proceed. Completing four or five grants advantages during the descent.
A. ARCHIVES
MIRIAM Valid file and accession numbers point to records that do not exist.
NPC response
Web-edition GM guidance: Miriam clears one corner of an already crowded desk, not the whole room. She asks the characters to put the crate's documents in date order and explain where each was found. Careful handling and a clear account earn her attention; accusations that someone in Archives is hiding the files make her insist on supervised research. She says, 'A missing folder leaves a gap. These references have destinations, but the destinations have never been entered.'
Evidence and setbacks
Use the checks below to answer different questions. Investigation connects an index reference to an empty accession entry; Technology finds the same reference in a scan of the older paper index, ruling out a recent database mistake. Persuasion earns permission to inspect unprocessed engineering binders by offering to keep them in order and record every item consulted. On a failed check, Miriam supplies the essential contradiction herself, but the search takes longer or she keeps the originals at her desk. These are costs, not additional rolls required to continue.
- Investigation DC 13
- Reveal ghost index entries.
- Technology DC 12
- Show that the entries predate the current database.
- Persuasion DC 12
- Gain access to unprocessed engineering storage.
Benefit: Advantage on the Junction 14 research challenge.
B. TRANSIT OPERATIONS
ANIKA Route U-14 follows internal standards, but no current or historic passenger service used it.
NPC response
Web-edition GM guidance: Anika speaks between radio calls, with a live departure board behind her. She first asks whether the group has evidence of a passenger-safety problem. Give her a copied route sheet rather than interrupting dispatch with the entire crate. She traces the route with a pen: 'No boarding times. No passenger stops. Whoever used this timetable was moving something else.' Helping her finish a service update or waiting through a dispatch call can earn cooperation without a social roll.
Evidence and setbacks
Investigation distinguishes maintenance destinations from passenger destinations; Systems matches the stop sequence to freight elevators and service nodes on the building plan. Ask the players to point out the pattern they are testing before rolling. A failed check produces a plausible but unhelpful public-floor route, which Anika corrects when she has a free moment. The group still obtains the maintenance lead, but must wait or accept an escorted route through B1 rather than navigating it independently.
- Investigation DC 13
- Identify it as a maintenance route.
- Systems DC 12
- Trace stops to freight elevators and service nodes.
Benefit: Identify the B1 freight route without delay.
C. SECURITY
RAFI Prior keys, passes, and tags appeared near infrastructure.
NPC response
Web-edition GM guidance: Rafi takes the conversation away from the public counter before admitting there were earlier incidents. He wants the group to distinguish an observation from a theory and not turn staff names into a public accusation. A character who describes exactly what was found, offers a written witness statement, or agrees to preserve the chain of evidence gives him a practical reason to help. 'I kept what turned up. I did not write a report saying the building was delivering its own keys.'
Evidence and setbacks
When the locker opens, let the characters compare an old pass, an infrastructure tag, and the UJ-14 key with the crate's contents. The useful discovery is a repeated designation, not proof of who placed the objects. Insight identifies Rafi's fear of ridicule; it does not compel him to confess. A failed Persuasion check means he retains custody and brings the key to the inspection himself. The lead remains available, but the characters cannot take or test the key unsupervised.
- Persuasion DC 12
- Rafi opens the informal evidence locker.
- Insight DC 12
- Rafi withheld the incidents to avoid ridicule.
Benefit: Obtain a utility key stamped UJ-14.
D. CURIOUS CART
KIT A similar badge sold to a collector for 600 crowns.
NPC response
Web-edition GM guidance: Kit keeps serving customers while watching how the characters handle the badge. Kit can describe its markings and the sale price without naming the buyer. 'Six hundred for a work badge. Not a medal. Someone wanted the department name, or what it opened.' Respect for the stall's business and a promise not to publish customer details make conversation easier; threats draw an audience and end any private discussion.
Evidence and setbacks
Persuasion obtains the account of the sale. Insight notices that Kit checks a place where contact cards are kept when the buyer is mentioned; the players must still ask for the card and explain what they will do with it. On failure, Kit confirms the sale but offers to pass on a message instead of handing over the contact. Either result establishes a market for the objects and a future lead. Keep the collector offstage in this session, and do not let this optional lead become a requirement for reaching B2.
- Persuasion DC 11
- Kit describes the sale.
- Insight DC 12
- Kit retained a buyer contact card.
Benefit: Gain a Session 2 lead and establish that a market for these objects exists.
ROLEPLAY PROMPT
Ask each NPC what would make the incident personally difficult. Security fears reputational damage. Archives fears institutional erasure. Transit fears service disruption. Kit fears losing a source. Tomas fears that a dangerous system is operating outside engineering control.
E. BUILDING MAINTENANCE
TOMAS The work orders use authentic terminology and internal form logic.
NPC response
Web-edition GM guidance: Tomas studies the readings before the names. He checks that the pressure figures, inspection sequence, and sign-off boxes describe an actual maintenance task, then pauses at the southern tunnel reference. 'The person filling this in knew the work. That does not make the route safe.' Characters earn his cooperation by distinguishing a technical concern from speculation and accepting that he controls access to the plant.
Evidence and setbacks
Engineering identifies why the readings and procedure fit together; Insight notices Tomas's hesitation at the tunnel designation and opens a conversation about what he has heard on overnight callouts. Neither check identifies the writer or explains the collapse. If a check fails, Tomas still confirms the forms' authenticity, but requires a slower briefing or a second look at the plans. He provides required safety precautions regardless of rolls; the benefit is his personal escort and preparation, not permission to skip safety after success.
- Engineering DC 14
- Confirm readings are technically coherent.
- Insight DC 14
- Tomas recognizes the southern tunnel implication.
Benefit: Tomas personally escorts the party and brings correct safety gear.
Back to topScene 5: Finding Utility Junction 14
PURPOSE: CONVERT SCATTERED CLUES INTO A
PHYSICAL DESTINATION
Miriam assembles the group in Archives after closing the public desk. Flat files, microfilm scans, and engineering binders cover a worktable.
Questions and approach
Web-edition GM guidance: Put three questions in front of the players: Where was Junction 14? How did workers reach it? Why do current plans say that route cannot be used? Keep the crate's recent work order beside the older plans so the contradiction stays visible. Each player describes a method and chooses a question before making one of the checks below. Different skills should reveal different pieces of the answer, not require repeated rolls for the same fact.
Evidence for each success
Narrate each success with something concrete. Investigation links a form reference to a utility binder. History places the abandonment in a reconstruction period. Technology makes the B2 access label legible on an old scan. Persuasion gets a custodian to identify which plan series records service routes. Engineering follows the pressure readings to a likely junction. Administration connects an old project code to that plan series. These are supporting details toward the challenge's existing outcome; reserve the complete diagram and additional Sector C information for the stated success results.
Setbacks and optional research
On each failed roll, reveal a partial fact but impose a practical setback: an unreadable scan, an obsolete numbering key, a contact who cannot answer until the next shift, or a binder that must remain under Miriam's supervision. Count that roll as one challenge failure. Do not advance the Tension Clock for every failed roll; apply the existing clock consequence if the overall challenge fails. At the fifth success, give the group the usable diagram and offer a choice: proceed now, or continue researching toward seven successes while retaining the same failure count. If that optional research reaches three failures, they keep the diagram already earned but gain no exceptional-success information. Even an overall failure before five successes leaves the B2 access location available, with Tomas interpreting the missing details on site.
RESEARCH CHALLENGE
Gain 5 successes before 3 failures. A skill can be repeated only if the player describes a new method.
- Investigation DC 13
- Follow form references across departments.
- History DC 12
- Identify a reconstruction period after structural failure.
- Technology DC 12
- Recover a low-resolution scan of an obsolete utility diagram.
- Persuasion DC 12
- Reach a retired worker or after-hours records custodian.
- Engineering DC 13
- Infer where pressure readings would be taken.
- Administration DC 12
- Decode old project and cost- center numbers.
SUCCESS
The characters recover an infrastructure diagram showing B2, Service Tunnel Access, Sectors A-C, and Utility Junction 14.
A red stamp reads ABANDONED AFTER STRUCTURAL FAILURE .
EXCEPTIONAL SUCCESS
With 7 successes before 3 failures, the group also learns that Sector C carried utility and narrow-gauge maintenance traffic farther south.
FAILURE
The diagram is incomplete but still identifies Service Tunnel Access on B2. Tomas must interpret the rest on site, and the Tension Clock advances.
THE CONTRADICTION
The crate includes forms dated three days ago: "Tunnel Sector C clear," "Utility Junction 14 operational," "pressure stable," and "service access confirmed." Every modern plan marks the route as collapsed.
DECISION POINT
Tomas refuses unauthorized entry but can conduct a legitimate safety inspection. To secure cooperation, the group must show credible risk to the building, protect staff confidentiality, or invoke Rafi's security authority. Use Persuasion, Engineering, or another suitable approach at DC 13. On failure, Tomas still goes, but no one enters B2 without signing the incident log.
Back to topScene 6: The Working Basement
The freight elevator opens onto bright concrete and ordinary work. A forklift reverses with a warning tone. Pallets wait in marked bays. Cold-room compressors cycle behind insulated doors while a mechanic calls for a wrench across the fleet workshop. Nothing about B1 feels abandoned.
THE ROUTE THROUGH B1
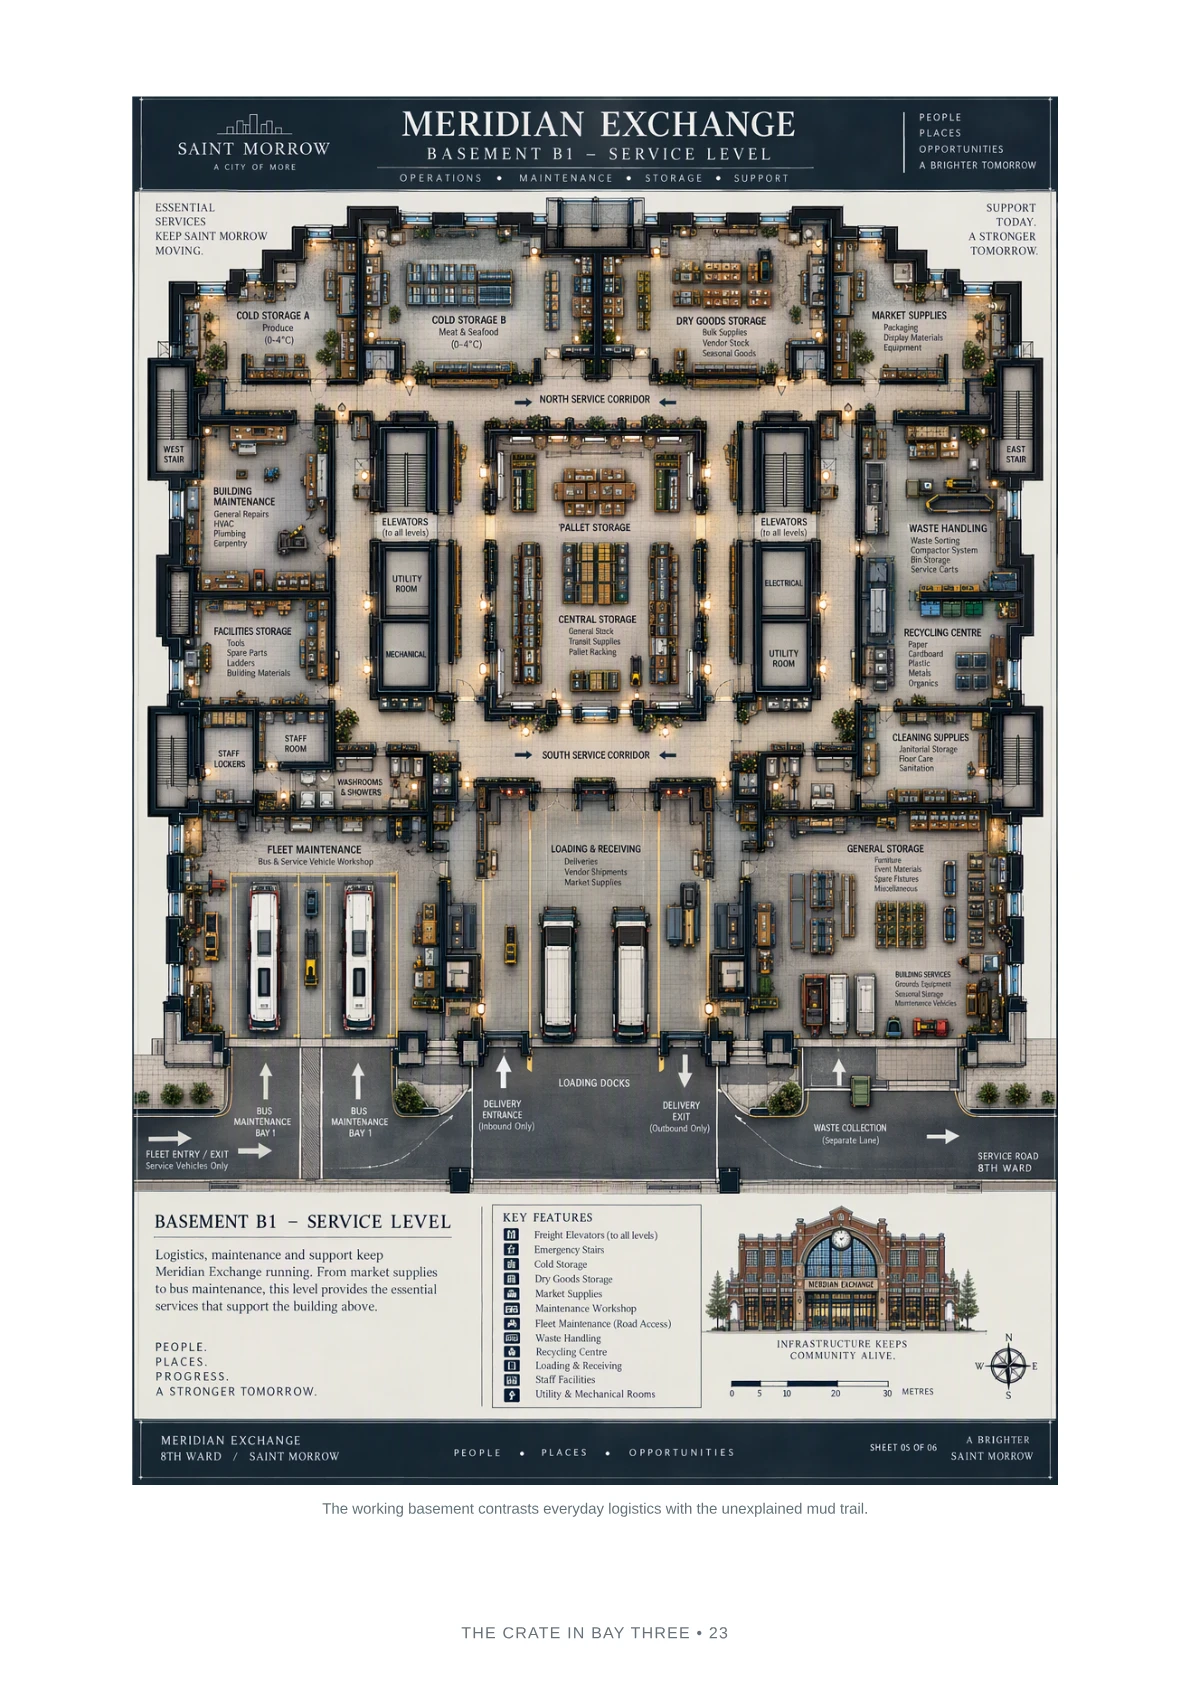
Tomas leads the group from Loading and Receiving past Central Storage, the Building Maintenance Workshop, and the south service corridor. Use the map to let players orient themselves.
EXPLORATION CHECKS
- Perception DC 12
- Find small patches of pale mineral mud near a maintenance threshold.
- Tracking DC 12
- The residue is recent and includes a narrow cart wheel.
- Investigation DC 13
- A cleaning log shows the same mud was removed twice this month.
ENCOUNTER: FREIGHT LANE HAZARD
A pallet stack shifts as a forklift turns near the group. This is not sabotage. It is a credible industrial hazard made worse by distraction.
- Perception DC 11
- Warn the operator before the stack falls.
- Athletics DC 13
- Stabilize a light outer crate or pull someone clear.
- Authority DC 12
- Clear the lane without causing panic.
Failure costs time, advances the Tension Clock, and reinforces why Tomas takes access rules seriously. Avoid serious injury unless the table wants a harsher tone.
HUMAN MOMENT
A B1 worker asks Tomas whether the strange crate means layoffs, inspection trouble, or service closure. Tomas answers, "It means we check the building." This reminds the group that institutional mysteries affect ordinary livelihoods.
OPTIONAL ENCOUNTER: THE MISPLACED KEY
A utility key from the crate fits an obsolete B1 cabinet. Inside are blank forms, a dry grease pencil, and a tunnel safety lamp whose battery was charged recently. This encounter is optional and provides another physical contradiction.
WEB-EDITION GM GUIDANCE
Evidence at the threshold
Pause at the maintenance threshold and ask what the group compares with its earlier evidence. The mud is a small patch under an otherwise ordinary working door, not a dramatic trail through the whole basement. Perception locates it; Tracking identifies the narrow wheel impression; Investigation compares repeated cleaning entries. If the players miss it, a worker can mention that the same grit keeps returning after cleaning. That preserves the connection without granting the more precise age or wheel evidence for free. Never identify the workers responsible from residue alone.
Resolve the freight hazard
For the forklift hazard, show the unstable outer crate before asking for an action. Warn the operator, pull a person clear, or direct pedestrians out of the lane: resolve the chosen approach with its existing check, not all three in sequence. Characters should not try to catch a loaded pallet or stand under it. A failure blocks the lane and requires a cleanup pause; apply the stated clock advance once for the incident. Tomas uses the pause to repeat the safety briefing, not to abandon the investigation. Let a considerate response to the worried worker earn trust without another roll.
The optional cabinet
If you use the cabinet, Tomas supervises testing the key and checking the lamp. Describe a charge indicator or a routine battery check rather than asserting that it proves someone used the tunnels. The fresh charge contradicts the cabinet's neglected appearance, but there may still be an ordinary explanation. Ask whether the characters photograph the contents, leave them in place, or request that Tomas log them. Each is a valid choice; none unlocks a hidden route or bypasses the B2 safety boundary.
Back to topScene 7: Basement B2
Heat and vibration replace the warehouse noise. Pipes rise in ordered banks. Pumps thrum through the floor. Indicator lights mark the working rhythm of boilers, chillers, ventilation, electrical distribution, water systems, and emergency power. Every room is labeled. Every system has a purpose. The official map is exact.
MECHANICAL LEVEL TOUR
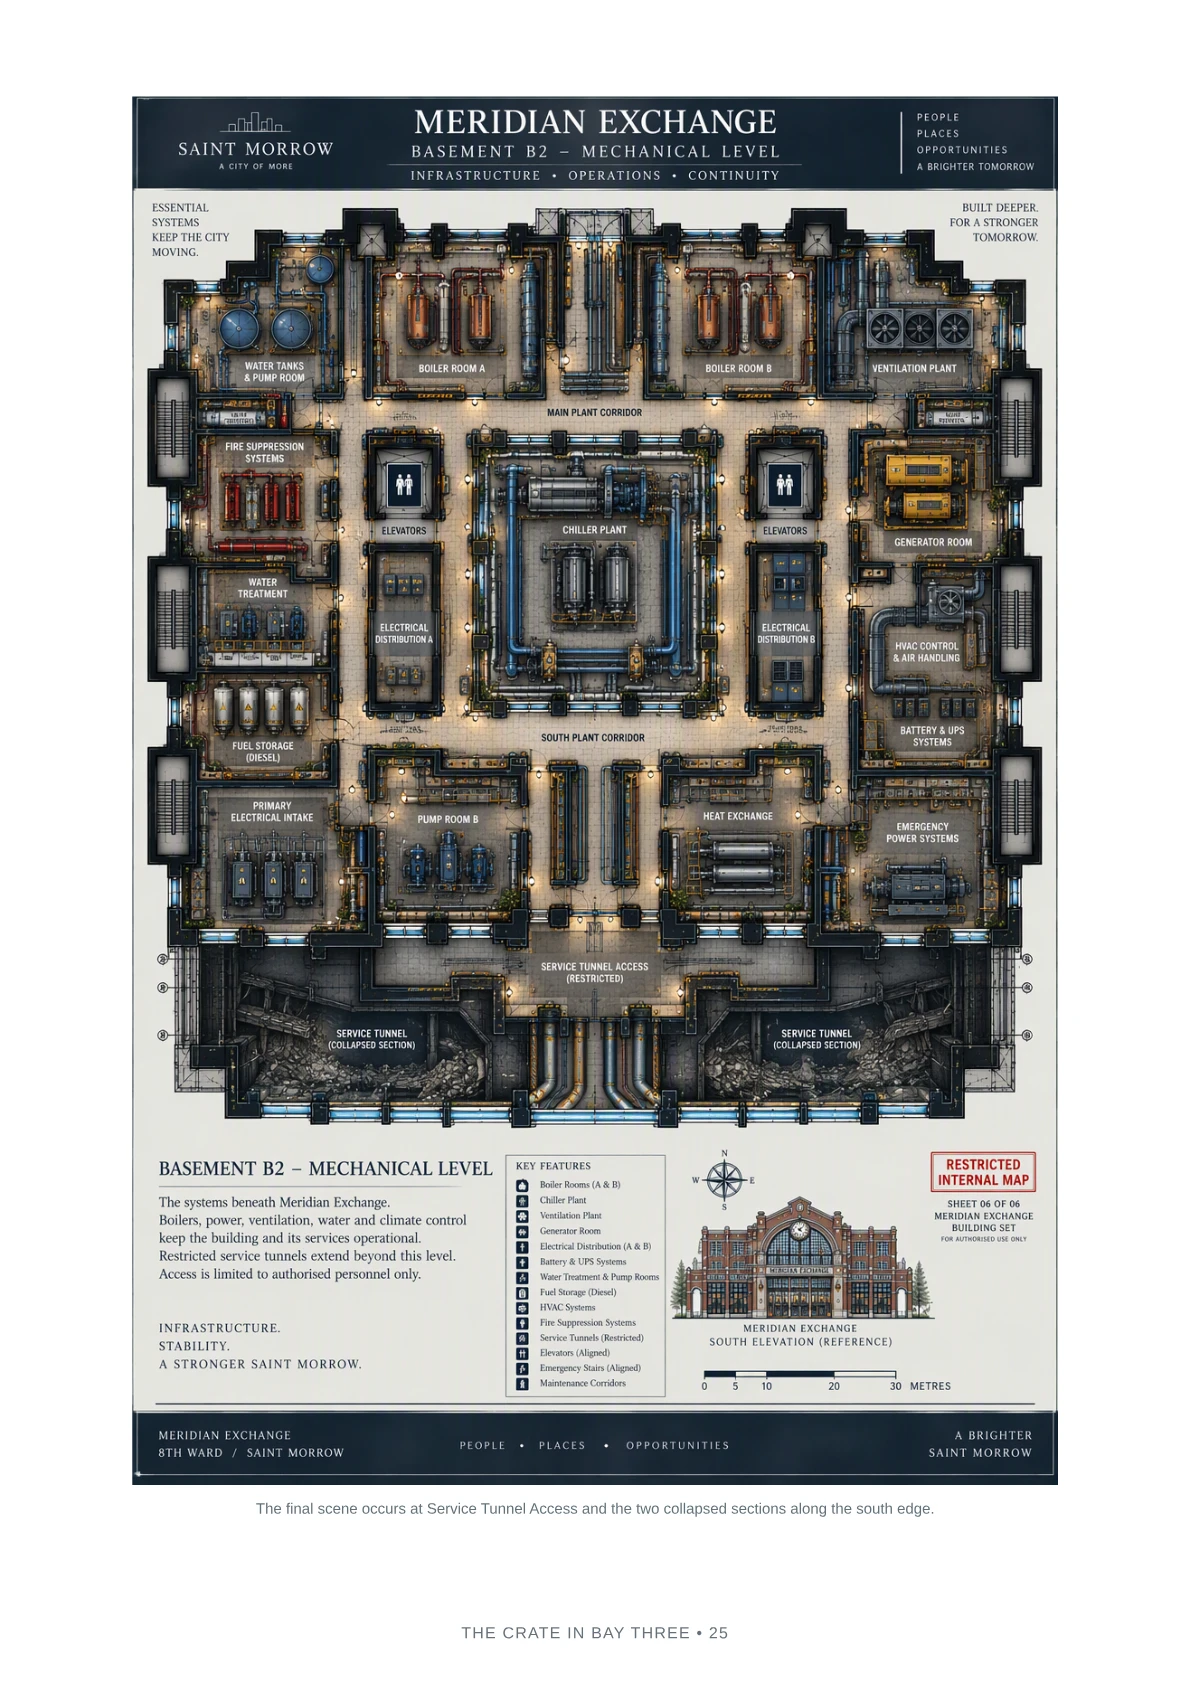
Move south through the Main Plant Corridor, past the Chiller Plant and Electrical Distribution rooms, then along the South Plant Corridor between Pump Room B and Heat Exchange. Normality is important. Let Tomas identify each system and answer practical questions.
ENVIRONMENTAL CHALLENGE
A pressure-release cycle triggers a loud burst and brief steam plume behind a protected valve cage.
- Engineering DC 11
- Recognize a normal cycle and prevent panic.
- Perception DC 13
- Hear a second, delayed metallic response from farther south.
SERVICE TUNNEL ACCESS
The restricted door at the south end is slightly open. The lock hangs in place, undamaged.
- Security DC 13
- The door was opened with an authorized key.
- Investigation DC 13
- The opening is recent; fresh lubricant marks the latch.
- Technology DC 14
- The access sensor reports no opening event.
SAFETY BOUNDARY
The group can enter the access chamber and see both collapsed sections. The adventure ends before anyone crosses or excavates the rubble. Tomas will not permit unstable entry, and the visible collapse is complete.
FINAL EVIDENCE
Beyond the door lie cold air, mineral mud, and concrete dust. Several boot tracks and one narrow cart wheel emerge from the direction of the collapse.
- Tracking DC 12
- The tracks lead outward, not inward.
- Investigation DC 13
- At least three people and one cart passed within the last week.
- Perception DC 14
- A distant metallic closure sounds beyond the rubble.
WEB-EDITION GM GUIDANCE
Normal machinery and unusual sounds
Give the group time to ask what normal operation sounds like before the pressure-release cycle. Tomas identifies the protected valve cage and the safe walking route. A failed Engineering check produces uncertainty, not an explosion. A failed Perception check means the secondary sound is masked by the plant. On success, describe a delayed metal response from the south without assigning it a source. Keep machinery competent and maintained so that the restricted door, rather than generalized decay, becomes the disturbing exception.
Inspect the access door
At the door, ask who records its position before Tomas touches it. Security interprets the undamaged lock; Investigation identifies recent lubricant; Technology compares the open door with the sensor record. These are three independent observations, not three compulsory checks to enter. On failure, the group records what is visible but cannot establish that particular inference. Tomas can authorize entry into the safe access chamber without a successful roll. Do not turn the sensor discrepancy into proof of hacking, a named intruder, or a supernatural mechanism.
Evidence and the safety boundary
Inside the chamber, distinguish visible facts from interpretations. Everyone can see mud, tracks, the cart groove, and the blocked tunnel. The checks establish direction, a minimum number of people, recency, or an earlier sound beyond the rubble. Failed checks leave those details uncertain; they do not erase the tracks or prevent the logbook discovery. The closing clang in the next section is heard by the group regardless of the earlier Perception result. Tell players explicitly that this session covers inspection up to the collapse, not excavation. If they want to push farther, let them record that intention and plan an authorized survey for a later session; no successful roll makes the rubble safe tonight.
Back to topThe Logbook and Ending
THE DISCOVERY
A maintenance notebook lies beside the inner gate. It is not one of the crate's contents. The cover is damp at the corners, but the most recent ink is crisp.
Discovery and next-session choices
Web-edition GM guidance: Make the notebook available without a discovery roll. Give the players the entry below and time to compare its date and signature with the crate's records. Ask each character to name one observation they can report with confidence and one question they cannot yet answer. Tomas can confirm the old collapse and the technical language, but cannot explain the tracks, identify J. Cress, or tell them how to cross. After the final reveal, record whether the group photographs, takes, or leaves the notebook under supervision, and who they want to contact next. Keep those choices as consequences for the next session rather than resolving the mystery here.
MERIDIAN EXCHANGE UTILITY OPERATIONS
- DATE
- Three days ago
Shift complete. Utility Junction 14 operational. Tunnel Sector C clear. Pressure levels stable. No abnormalities.
J. Cress
FINAL REVEAL
Tomas raises the flashlight. Broken concrete fills the tunnel from wall to wall. Steel reinforcement curls from the rubble. Mineral water threads between fragments that have not moved in years. In the foreground, fresh footprints cross the mud. Every print points away from the collapse.
Tomas says only:
"That collapse is older than I am."
Then a heavy metallic clang sounds somewhere beyond the rubble. Cut to black.
WHAT THE CHARACTERS KNOW
- The crate arrived without a normal delivery.
- Its contents are authentic and span decades.
- Utility Junction 14 once existed beyond B2.
- Official plans mark access as collapsed.
- Someone recently opened the service tunnel door legitimately.
- Several people and a cart came from the collapse.
- A current logbook records normal operations.
- No one present understands how.
REWARDS
Use a milestone rather than combat experience. Each character also gains one useful contact among Rafi, Miriam, Anika, Tomas, or Kit. The group may retain a copy of the diagram, a photograph of the logbook, and Rafi's incident reference number.
EPILOGUE
The following morning, Miriam calls. The signature J. Cress appears in maintenance reports from 11, 29, and 52 years ago. The handwriting is identical. No employee with that name has ever worked for Meridian Exchange.
Back to topOptional Side Content and Future Hooks
OPTIONAL SIDE SCENES
THE COLLECTOR'S CARD
Kit provides a business card bearing only a name, a private mailbox, and a hand-drawn symbol that resembles two parallel tunnel lines. This is a lead, not an answer.
THE CHARGED LAMP
The obsolete tunnel lamp found in B1 holds a modern battery cell. A small scratch reads "C-14."
THE BLANK BADGE
One badge from the crate has no photograph or name. When placed near an access reader, the reader briefly displays SHIFT ACTIVE without unlocking.
THE WORKER WHO REMEMBERS
A retired cleaner recalls muddy prints appearing near freight elevators years ago. The prints always vanished after the first public bus departure.
FUTURE ADVENTURE HOOKS
BENEATH THE COLLAPSE
A new cavity opens after a minor overnight tremor, exposing intact track and a powered signal lamp.
THE BUYER
The collector who purchased the badge disappears. The private mailbox contains a current Junction 14 roster.
ROUTE U-14
A transit display briefly announces a maintenance departure with no platform, vehicle, or destination.
THE PRESSURE READING
Tomas discovers that one B2 gauge has always included output from an unlisted downstream sensor.
J. CRESS
A person using that name signs into another city facility at the same time the B2 tunnel sensor fails.
CAMPAIGN PRINCIPLE
The deeper city should influence modern Saint Morrow before it is directly explored. Let rent, work, transit, safety, trade, and public trust remain central to the consequences.
GM CHECKLIST
- Show normal city life before strangeness.
- Give every required conclusion multiple clues.
- Make the documents technically plausible.
- Allow NPCs to protect their responsibilities.
- Keep B1 active and B2 functional.
- End on physical evidence, not a full explanation.
Ground Floor: Transit Concourse
Use Bay C as staff shorthand "Bay Three." The incident begins near the southern service rooms and Bay C/D area.
Level 1: Market Hall
Curious Cart is Stall 7, west of the Clock Atrium.
Level 2: Administration
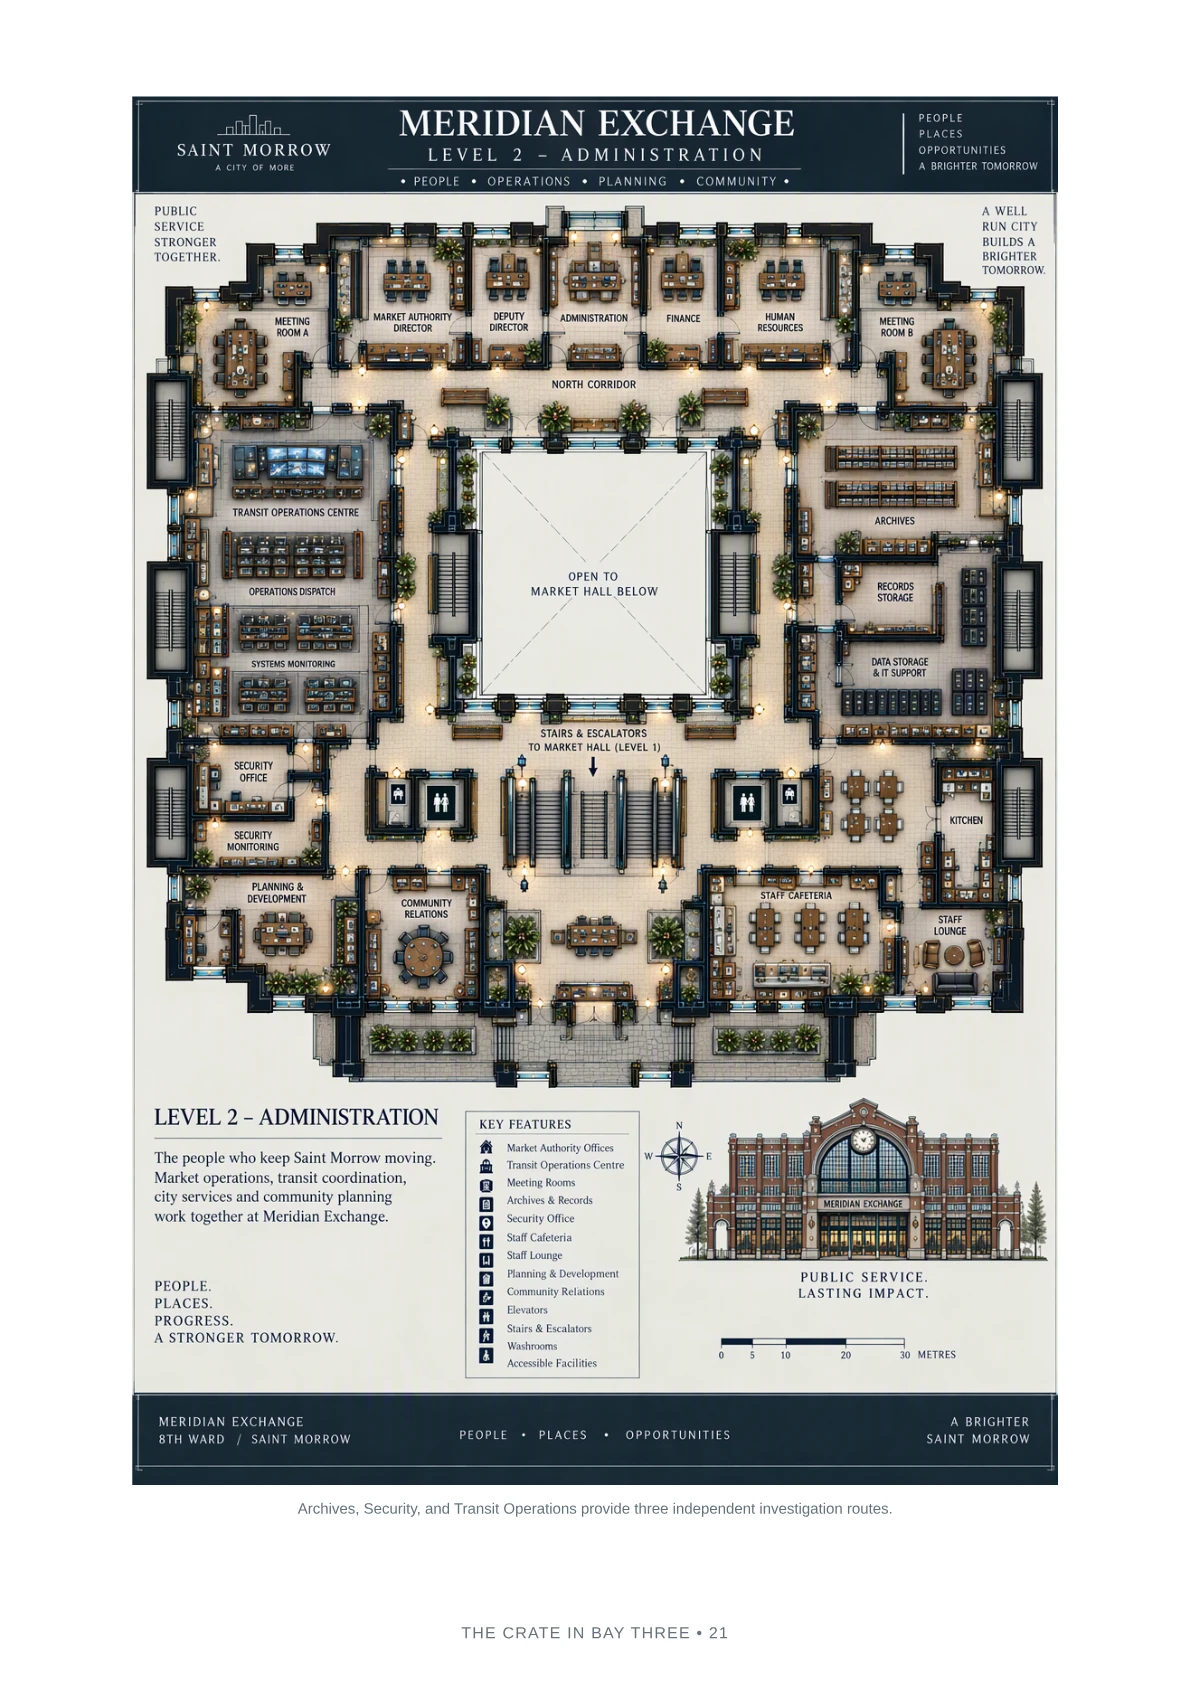
Archives, Security, and Transit Operations provide three independent investigation routes.
Basement B1: Service Level
The working basement contrasts everyday logistics with the unexplained mud trail.
Basement B2: Mechanical Level
The final scene occurs at Service Tunnel Access and the two collapsed sections along the south edge.
Evidence Pack: Player Handouts
Work order excerpt
MERIDIAN EXCHANGE UTILITY OPERATIONS DIVISION
- WORK LOCATION
- Utility Junction 14
- ACCESS ROUTE
- Tunnel Sector C
- WORK TYPE
- Routine pressure inspection
- STATUS
- Complete
- DATE
- Three days ago
Pressure stable. Transit access available. No corrective work required.
- AUTHORIZED
- J. CRESS
Recovered diagram notes
- B2 Mechanical Level
- Service Tunnel Access
- Sector A
- Sector B
- Sector C
- Utility Junction 14
Archive stamp: ABANDONED AFTER STRUCTURAL FAILURE. Current floor plans end at the collapsed tunnel sections.
Security timeline
| Time | Event |
|---|---|
| 03:16:52 | Receiving room camera operating normally. Room empty. |
| 03:17:00 | Signal loss begins. |
| 03:17:14 | Signal returns. Crate present. |
| 06:41 | Morning staff open room and notify security. |
End-of-session evidence
Shift complete. Utility Junction 14 operational. Tunnel Sector C clear.
Pressure levels stable. No abnormalities.
J. Cress